Showing posts with label art. Show all posts

Friday, February 6, 2009

Gum Wrapper Art Box


I admit it. I'm the crazy person at work asking people to save plastic bottles, soda can tabs, bottle caps, and yes, even gum wrappers! I can't help myself! The guy in the office next to me chews gum - a lot of it. He had several of the wrappers on the low file cabinet next to his desk one day when I walked in and I was immediately drawn to their potential. Copper, silver, gold, and green. The colors and textures were like a lure to a fresh-water fish. "Will you save those for me?" Without batting an eye, he replied, "Sure!" He has faithfully done so for weeks as I have pondered what to do with these little strips of shimmering possibility. As I began collecting them in my drawer at work, I also used the last tea bag from my wooden tea box. I placed it in the same drawer as the gum wrappers and as they met, an idea was born. A gum wrapper covered tea box. Why not?

Here is what you will need to complete this project:
  • foil gum wrappers
  • an empty wooden tea box or container of your choosing
  • adhesive spray or glue
  • sandpaper
  • stamp and ink
  • spray fixative
I take great joy in turning what would be trash into something useful or art that brings me or someone else joy.  I hope you enjoy this project.  
See it.  Create it.

For my project, I folded the sides of the gum wrappers along their original folds and glued them to the front, sides, back, and bottom of the empty wooden tea box, overlapping the top edge.  One one side,  I used a contrasting color for a single strip - just for the heck of it.


Below is a picture of the box with the gum wrappers in all in place.

Next I stamped one of the sides for added interest.  Be careful as the ink will smudge.  Allow to dry (I waited several hours) and then lightly spray with a fixative.


Gently sand the lid and the sides of the lid so that when removed, the lid will not rip the foil.
There you have it.  A creative and interesting looking box.  Now, what will you create?

Tuesday, February 3, 2009

Clip Art - Literally

So today I needed a clip for a packet I was compiling for a client and as I pulled the container of clips from the cabinet I saw the black and silver gems in an entirely new light.  Even the most mundane things, such as metal clips, can take on symmetry and grace.   I decided to do an exercise, dumping the clips onto my worktop and letting art happen.  I snapped pictures along the way, taking advantage of two different lighting sources.

I encourage you to try this exercise.  Make it a point to look at everything today in a new light. Seek out ways to make the ordinary, well, extraordinary.  What was just a simple pile of clips this morning became much more.  Try the exercise with just anything you encounter during your day.  Rely on as few different components as possible.  For example, I didn't use anything other than clips.  

What may seem like a simple exercise may just open your eyes to the amazing possibilities around you.  See it.  Create it.

Here they are, the clips that inspired.

I began clipping them end to end.


Their utility as clips begins to fade and the grace in their form begins to appear.


Another perspective.
 

Other shapes.


Tuesday, January 27, 2009

Vintage Newsprint - Art as Promotion


So, you have finally realized that you are an artist and you want to get the word out about the awesome work that you do. How do you afford the printing cost of business cards and promotional material without selling your mom's Buick without her permission (never advised)? Think outside the box and do the unexpected. I was rummaging around in our utility area and I came across old newspaper clippings that my wife's grand parents and great aunt had saved. Names and faces that meant something to them. Articles about when to clean your percolator, what to do if your cattle seemed sluggish, and the latest straw hats available for just $3.00. Marriages, deaths, and updates from the front lines of WW II. These yellowed and brittle glimpses into the past sparked my imagination. I cut a few articles and placed them on various papers I had around from other projects. I began to do some stamping and distressing and soon realized I could make some pretty amazing art and slices of history which could server two purposes. First, the vintage newsprint is re-purposed and can live free from the box in the utility room. Second, I can promote the blog by creating unique bookmarks. I could just as easily have made postcards.  I made a few business cards just to see what they would look like. See for yourself. See it. Create it.

As always, hover of the slideshow and click to stop it and then use the arrows to move at your own pace if it moves too quickly. It generally does (and is beyond my control - my apologies).

Saturday, January 24, 2009

Art is Where you Find it


Today's entry was to have been how to make a pillow from old jeans.  However, one member of this dynamic duo deleted the instructions and took off for a day trip to Ikea!  May she have a safe and enjoyable adventure.  So we interrupt today's programming to bring you this special report.

Art is Where you Find it.

You know us.  I look at an old rusted wrench and I see an amazing piece of history with stories to tell.  I feel that it deserves a place in our home just as I would make room for a painting by one of my favorite artists (such as this AMAZING artist www.tomgirlstudio.com).


And so we come to this simple piece of art which is making a statement about art.  It is more than sticks on the wall.  It is memories of a warm afternoon, of laughs and time shared together.  Of time spent with friends.  Make art something you do, not just something you walk past.


Monday, December 22, 2008

Architectural Salvage as Candle Holder


Once again we return to the vintage doorknob faceplates.  We picked up more of these gems during another trip to a local Architectural Salvage warehouse. If you aren't lucky enough to have one nearby, there are many opportunities to buy great pieces of history online. 

Here is what you need to make this amazing Glowing Architectural Salvage Art:
  • Old Doorknob Faceplates
  • Brass Fasteners
  • Aluminum Flashing
  • Hammer
  • Metal Cutters
  • Screwdriver or Hole Punch
  • Gloves
  • Protective Glass
  • Votive Candles
The process is simple.  The look is amazing.  As always, wear your gloves and protect your eyes. Watch the slideshow below to see how it comes together.  If it does not start for you, click the play button.  As always, if it moves too quickly, hover over it and click the pause button, then the arrows to move at your own pace.

Glowing Architectural Salvage Art.  See it.  Create it.


Monday, December 1, 2008

Copper Greeting Cards - Keepsake Art


You can make keepsake original art with 40 gauge copper and inexpensive card stock and envelopes.  I purchased a set of 200 blank cards and matching envelopes for under $20.  With little more than a pen, the handle of a paint brush, glue, and copper, the blank cards are transformed into one-of-a-kind art.  The trick is to be comfortable with both positive and negative space.  Once you practice on a few squares of copper, you will soon get the hang of it.  These cards could also be further embellished with message, rivets, copper wire, inked, or left simple as these have been.    To get started you will need:
  • 40 Gauge Copper
  • A pen
  • A small paint brush handle or small burnishing tool
  • Glue
  • Textured decorative paper such as is used in scrap books
  • Card stock and matching envelopes
  • Scissors

Watch the slide show below.  Hover over the picture and pause the slide show if it moves too quickly, then use the arrows to move at your own pace.

You will enjoy making these.  See it.  Create it.


Saturday, February 2, 2008

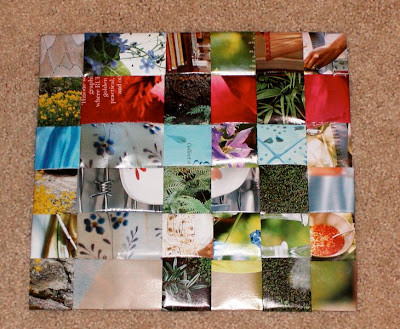
Old Magazines Make Great Art


Believe it or not, you can make a visually interesting and beautiful piece of art from the pages of old magazines and some left over construction paper. All you need is:

  • visually pleasing pages from magazines
  • construction paper
  • foam board
  • tape
  • spray acrylic
  • spray adhesive or glue
  • scissors
  • utility knife
  • cutting board
  • t-square
As always, we have provided step by step instructions in the slides below. If the slides move too quickly for you, hover your mouse over the slide, click the pause button, and use the left and right arrows to navigate. See it. Create It.

Saturday, January 19, 2008

Industrial Candlestick Holders


There is just something about re-purposing items that have either long been discarded or that were intended for an entirely different life that gives me satisfaction. Today I went to my local hardware store looking for inspiration and found it immediately in six simple pieces of hardware that resulted in two amazing candlestick holders that would look at home in either a loft apartment or condo, or as a visual departure in a more traditional space. I am afraid the photos of today's project don't do it justice. They are, to me, functional art.

The items for today's project can be found online or at your local hardware store. This is what you will need to make the taller candlestick holder:
  • 1/2 inch Floor Flange
  • 1/2 X 6 inch Galvanized Threaded Pipe
  • 1/2 X 1-1/4 inch Galvanized Coupler
  • A candlestick (beeswax looks great in these)
  • Coffee Beans
  • Aluminum Foil
Click on the slide show below for step-by-step instructions. Click pause if the slides move too quickly and then the right and left arrows to progress through the slides. See it. Create it.


Saturday, December 29, 2007

Textured Paintings


You can create warm, textured paintings easily using joint compound. All you need is:

  • a framed canvas from your art supply store
  • a paint brush
  • acrylic paints in warm colors
  • joint compound from your hardware store
  • a spatula to spread the joint compound
Create several and group them together to warm up any room.

See our slide show below. Click the play button to begin. If it moves too quickly, hover over the slides with your mouse, click the pause button, then use the right and left arrows on the screen to navigate. See it. Create it.

Saturday, December 22, 2007

The look of Relic Art using Copper.


You can create the look of Relic Art using readily available supplies from your local hardware supply store, grocery, and art supply store. For this project you will need:
  • copper flashing
  • protective gloves (leather works well)
  • metal cutters
  • a wooden burnishing tool
  • white vinegar
  • salt
  • a spray bottle with water
  • lemon juice
  • an object for your relief
  • a water-tight container such as a plastic storage container
Enjoy the slide show with step-by-step instructions. Click the arrow to play. Pause the slides if they are running to fast, then click the right arrow to move at your own pace. See it. Create it.